Rss Feed
  1. To have read more option in wordpress

    Friday, 22 February 2013


    Splitting Content » The More Tag


    You can truncate your blog entries so that only the first part of certain posts is displayed on the home and archive pages. When you do this, a link will be placed directly after your excerpt, pointing the reader to the full post.
    You can find the More Tag button in the first row of the visual editor toolbar or by pressing Alt+Shift+T:
    more_button

    Using the More tag

    Refer:
    http://en.support.wordpress.com/splitting-content/more-tag/


    Customizing the Read More

    The Excerpt Basics

    Excerpts (teasers) can be shown on WordPress through two methods:
    • The first, keeping the_content() template tag and inserting a quicktag called moreinto your post at your desired "cut-off" point.
    Refer:

    http://codex.wordpress.org/Customizing_the_Read_More


    How to Display a Read More link in WordPress Excerpts

    To prevent duplicate content, improve site load time, and for better SEO many bloggers have started to use post excerpts. Excerpts are mini-descriptions of the posts shown on the main blog page, category pages, and archive pages. You can see a live example by visiting any of our categories. But if you notice, our read more button is added on a separate line from the excerpt text. In this article, we will show you how to automatically add a read more link in WordPress Excerpts.
    First open your functions.php file, and paste the following code inside the php tags:


       // Changing excerpt more
       function new_excerpt_more($more) {
       global $post;
       return '… <a href="'. get_permalink($post->ID) . '">' . 'Read More &raquo;' . '</a>';
       }
       add_filter('excerpt_more', 'new_excerpt_more');

       add_filter('excerpt_more', 'new_excerpt_more');
    In this function, you are telling WordPress to remove the default more which looks like this: [...], and replace it with a link. This short and simple tutorial was requested via our suggestion form.

    Refer:
    http://www.wpbeginner.com/wp-tutorials/how-to-display-a-read-more-link-in-wordpress-excerpts/


  2. Creating a Custom Page Template in WordPress

    All WordPress themes have a file called page.php. This is your template file for all pages you have on your blog (remember, pages are distinctly different than posts). The page.php file is your default page template. To create a new one, just open that file in any text editor then “save as” a different file name. In my case, I named the template for my sales pagesignup_page.php.
    Now, at the very top of this new file, you’re going to want a block of PHP code as follows:
    <?php
    /*
    Template Name: [your page name here]
    */
    ?>
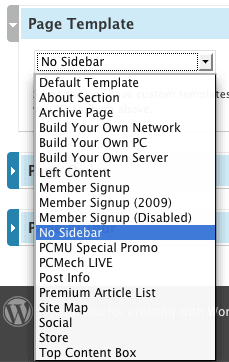
    Picture 1This is a PHP comment. Leave the “Template Name:” in place, but you need to change the name of the page. Once you have done that, upload this new file to your blog theme’s folder.
    Then, in WordPress, when you go to add or edit a page, scroll way down and you’ll see a setting for “Page Template”. You should see your new page template listed in the dropdown, using the name you entered above. To the right, you can see what my dropdown list looks like in my own WordPress admin panel. I have many different custom page templates in my system, all for different purposes.

    Customizing Even Further

    At this point, you would have a custom page template, but it would be an exact duplicate of your default page template. So, you would need to customize it. For example, if you want to get rid of the sidebar, just remove the the following line from your template:
    <?php get_sidebar(); ?>
    You can change any other HTML in this file that you want.
    If you want to include different a different header, you would need to hack the code just a bit. By default, the get_header() and get_footer() functions include the default headers and footers for your theme. However, you can replace these with custom PHP includes to any file you want. For example, you could replace:
    <?php get_header(); ?>
    with this:
    <?php include(“header_new.php”); ?>
    This would include the file header_new.php from your theme as your header. You would, of course, need to create a file called header_new.php and alter the HTML to make that your new header file for that page.
    You can do this same thing for your footer or even your sidebar if you want to include a different sidebar.

    Wrapping It Up

    The WordPress template system is insanely customizable once you know how to do it. Above is how I have gone about it for my sales page. I have a custom page set up, and it includes a custom header and custom footer (both with stripped down options). I left the sidebar out. In my case, I even put the HTML for the content of the page into the template itself. Inside of WordPress, the content field is blank. I just selected the custom page template, saved the page, and now my signup page works quite well.
    Repeat the same basic process for any page of your blog that you want to have a custom appearance. It is so much easier than trying to pack complicated HTML into the editing field of WordPress.
    Happy customizing!
    Refer:
    http://www.blogmarketingacademy.com/how-to-custom-page-template-wordpress/


  3. How to Make Your Theme Custom Menu Compatible
    When developing your own themes, developing your own theme locations could be important to the creation of your theme. The basics of integrating menu support involve defining menus (the name of our theme locations) and then calling them in our templates.
    First, let’s define some menus. Add the following code to your theme’s functions.php file:

    function register_my_menus() {
    register_nav_menus(
    array(
    'top-menu' => __( 'Top Menu' ),
    'footer-menu' => __( 'Footer Menu' )
    )
    );
    }
    add_action( 'init', 'register_my_menus' );
    This function assumes that we’re going to be building two menus, one for the main navigation and one for the footer. Now if we were to call the menu in our header.php or footer.php files, they would look like this:
    <?php wp_nav_menu( array( 'theme_location' => 'top-menu' )); ?>
    or
    <?php wp_nav_menu( array( 'theme_location' => 'footer-menu' )); ?>
    Creating your own menu locations for themes can be used in a variety of ways, especially if WordPress conditional tags are employed. For example, let’s say we wanted a user to see a menu only if they’re logged in. We could place the following code in the header.php file:
    <?php
    if ( is_user_logged_in() ) {
    wp_nav_menu(array('theme_location'=>'user-menu'));
    } else {
    wp_nav_menu(array('theme_location'=>'main-menu'));
    }
    ?>
    Conditional tags offer us the ability to show different menus on all kinds of system pages like archives, categories, specific pages, etc. You can find a list of conditional tags on the WordPress Codex.

    Reference:

    http://www.developerdrive.com/2012/02/how-to-create-and-use-wordpress-custom-menus/

    http://codex.wordpress.org/Navigation_Menus


  4. XAMPP is a great software containing Apache, MySQL, PHP, File server and many other modules/programs that make web development much easier.
    But sometimes after installation and selecting English language as default the selection will not affectphpMyAdmin and its interface is in German.
    The trick is simple, you will need to look up the phpMyAdmin folder inside the installation root, then you will find config.inc.php file, open it, then paste these two lines of code at the very top of the page:
     $cfg['DefaultLang'] = 'en-utf-8'; // Language if no other language is recognized
    or
    cfg['Lang'] = 'en-utf-8'; // Force this language for all users
    Save the file and reopen phpMyAdmin


  5. Adding tinymce in admin_edit page

    Go and grab TinyMCE from its website http://tinymce.moxiecode.com/download.php and copy the /tinymce/jscripts/tiny_mce folder to the /app/webroot/js
    Include js in app/views/layout/admin.ctp  

    <?php  echo $javascript->link('tiny_mce/tiny_mce.js'); ?>

    Set up the editor in view file 

    //set up the editor
    <script type="text/javascript"> 
        tinyMCE.init({ 
            theme : "simple", 
            mode : "textareas", 
            convert_urls : false 
        });
    </script>


    Refer: http://stackoverflow.com/questions/11056450/cakephp-and-wysiwyg-editor

  6. PHP to know

    Tuesday, 22 January 2013

    To redirect to previous page

    header('Location: ' . $_SERVER['HTTP_REFERER']);


  7. Website design tool and links

    Monday, 21 January 2013


    http://twitter.github.com/bootstrap/

    http://www.webdesignerdepot.com/category/code/


    Collection of HTML, CSS and JQUERY

    http://jqueryexample.com/

    http://www.htmldrive.net

    http://www.dynamicdrive.com/

    http://jqueryui.com/

    http://www.jacklmoore.com

    http://webdesignledger.com/tools/10-jquery-plugins-that-will-make-your-life-easier